Meet Yonathan. He’s an extremely motivated, funny newcomer from Honduras. His journey to Virginia has landed him in room 207 with me. “Why haven’t you updated my attendance, yet Ms. Sawyer? I turned in the absence note.” He’ll comment on other students, “why aren’t they doing more? I am.” His sense of justice is firmly developed and his sense of accountability, strong.
What does he need from me, his high school English language development teacher? Well, there’s the obvious. He needs to learn English and content so he can make progress in his pathway to graduation and an education. Let’s reference WIDA’s big ideas: he needs equity of opportunity, content integrated instruction, collaboration among stakeholders, and a functional language approach.
We EL teachers often think about equitable grading practices and scaffolds to meaningful access to core curriculum. However, we should also turn our attention to equitable access to computer science as a discipline. Computer Science and artificial intelligence/ machine learning are here to stay. I’d add, as our world is increasingly becoming interconnected and computationalized, EL students must have access.
Historically, our students have been shut out of computer science, yet “the demand for skilled technical professionals is expected to exponentially grow over the next decade, with many of those jobs focused on emerging technologies. Despite an estimated 78% of net new workers between 2020 and 2030 being Latine, they are being systematically shut out of opportunities to develop new digital and technological skills to keep pace with advancements”(Kapor Foundation). Solutions for inclusion must be identified to create a “more equitable technology ecosystem” that includes the assets, identities, and perspectives of the Latino community (Kapor Foundation). If our students are not, computer science will fail to address their linguistic and cultural values and needs. Technology reflects its creators and their data. Technology–when biased, can be devastating. Datasets must be inclusive and diverse.
Can webe a solution for inclusion? YES! EL teachers are an untapped resource. Often the first layer of community for our ELs and further, we operate with a crosscurricular mindset. We can be a solution. We can forge a pathway so our students have a meaningful to computer science curriculum and the opportunities it leads to.
“But my background is language–not computer science. Is this for me?” Computer science is not for the nerds, the old wealthy entrepreneur, mathy types, those who want to earn big money. It’s for us and our students, newcomer, MLs, SLIFE, Experienced MLs, Former MLs, because it’s for everybody.
Steve Jobs said, “Everybody in this country should learn computer science. It teaches us how to think.”
For everybody? “Everybody” includes us as teachers. “Everybody” includes our students. Note how he claims, it’s like a liberal art. Wait–so it’s like music, the arts, literature! It’s not just the ‘T’ in STEM. It dips into content across the curriculum.
Are we adding another standard? Are we adding “one more thing?” No! We know what promising practices are for ELs, we know that language and literacy development should happen simultaneously, across the content areas. Content as the context for language learning is essential. And for SLIFE students? Critical. Academic skills and content that both bridges gaps in knowledge and provides opportunities for functional language is key to providing equity of opportunity and access (WIDA Focus Bulletin on SLIFE 2015). And computer science, like language IS crosscurricular and can be integrated across the curriculum.
Computer science, like language, is crosscurricular!
(If I were to make a proposal to WIDA, it would be to promote CS integration in ELD with this graphic.)
With increased access, increased foundational knowledge, increased exposure, our culturally & linguistically diverse students who have been historically underserved and underrepresented in this field can participate fully in its creative possibilities and the career opportunities that result. And we can expand on our role as equity builders. EL teachers can! Let’s engineer the bridge to computer science.
Spend just 5 minutes exploring a coding platform and examine opportunities for functional English language development.See what sparks fly! Use the Lesson Spark! ✨ tool below to record your notes for future integration.
On Tuesday August 6, 2024 I have the honor of participating in a panel moderated by Larry Ferlazzo to discuss student goal setting in a webinar by the National Association of English Language Program Administrators (NAELPA). It’s truly an honor. I wanted to document my contribution and welcome yours!
Most of my students would tell you that learning English is their number one goal for coming to school. Motivation is high. The need is forefront. But, how does someone go about learning another language? It’s a process. A beautiful process unique to every individual. But how do I get there? It’s taking so long. Am I making progress? How do I get to my destination?
My own pathway to bilingualism began with first learning a language then extended into learning about language learning. My interest was sparked as a child wondering what Mrs. Pla, a Puerto Rican mama in my church, was saying to her children, then I moved into 3 years of high school Spanish to go straight to Old Dominion University where I earned a B.A. in Spanish and ended with a M.A. in Applied Linguistics. With linguistics, the pieces fell into place, and I fell in love. I had a growing understanding for what I experienced in my previous 7+ years of Spanish language study. I was developing a meta-awareness of how I had been learning.
A meta-awareness is often described as ‘thinking about thinking.’ For second language learners, ‘thinking about thinking’ can be made even more specific, meta-cognitive linguistic awareness, which is thinking about the mental processes of language learning. How am I utilizing language right now? What does the next level of proficiency look like? How can I extend my language as I communicate? What degree of precision am I using with my word choice? General, specific, technical?
Explicitly teaching students to reflect & understand where they are, what comes next, and how they get to their destination stirs up autonomy and independence and motivation. This is how I support linguistic goal setting and meta cognitive linguistic awareness in my classroom:
First – Beginning of the Year
I teach in Virginia which along with 40 other states has adopted the WIDA standards framework as our measurement of language growth and progress. We use the Proficiency Level Descriptors (PLDs) to describe their current level of language development and what they can do with language at the discourse level, the sentence level, and word/phrase level. WIDA further explains the PLDs, “DISCOURSE involves the organization, cohesion, and density of language. At the SENTENCE level, we see increasing grammatical complexity, at the WORD/ PHRASE level a growing precision of language.
To know where you’re going, you have to know where you are. At the beginning of the year, I implement Emily Francis’ language awareness beginning of the year goal setting activity that she generously shares here on her class Facebook page Mrs. Francis’ ESL Class. I am constantly inspired by her and recommend all multilingual teachers to follow her on X @EmilyFrancisESL and Facebook to have a window into a masterclass of quality language instruction in action. Following her method, I have the students learn about the language levels and embedded language expectations. We discuss the rubric, highlight and engage the meanings of key terms, and circle their proficiency level on the rubrics according to their WIDA screener score sheet or ACCESS score sheet if they were tested the year prior. Then, students use the rubric as a sentence bank and guide, list 3 skills they can do at their current level, then write about what level they are reaching for. They do this across the tested four language domains, listening, reading, writing and speaking. My upper intermediate/ advanced classes do this activity and turn it into an essay with an introduction paragraph and a concluding paragraph. In the introduction paragraph they introduce themselves and describe their language journey answering Wh- questions: who, where, when, why, and how. In their concluding paragraph, they write about how they use and hope to use their bilingualism in their home, school, and community.
Next – Throughout the Year
The development of this meta-cognitive linguistic awareness requires ongoing modeling. In my classroom you might hear Oh! “This is level 3–look at these expanding sentences we are writing here by writing___.” Or “we will begin with reviewing level 1 general vocabulary and now expand into some level 2 phrases and level 3 more-precise vocabulary for this unit.” In time, I’ll begin to ask the students pointed, reflective questions. Or I may simply highlight an opportunity to extend or enhance meaning and ask them why did I highlight this section, an invite to discuss thinking about language use together. I celebrate courageous use of the language. And in time, they do too. My tip to begin to incorporate this meta-language in your instruction is to keep the Proficiency Level Descriptors open on your desk or posted where you work. Constantly have them where you can see them as you plan and grade, will result in you becoming increasingly familiar with them, so you can draw your student’s attention to them.
More formal feedback for projects and unit assignments reference the rubric again. I circle where I see the students on the rubric, and then also give the student specific feedback on one of the criteria DISCOURSE, SENTENCE, WORD/PHRASE that was excellent, citing their own work and then I give advice on another. Take a look here at my adapted WIDA rubric for beginners/intermediate and here for upper intermediate/ advanced. Do note, that these forms are based on the WIDA rubric and not endorsed by WIDA.
Then – Collaborative Goal Setting
Federal guidelines require divisions to measure student language growth annually, and WIDA states monitor student linguistic growth with the ACCESS for ELs exam. Prior to testing in February, my students and I conference together 1:1. My students and I collaborate, using this ACCESS goal setting tool that I created on Canva. Feel free to make a copy to customize for your needs and update from year to year. Once in Canva, go to “File” then click “Make a Copy.” I’m delighted to share that Dr. Andrea Honigsfeld & Margo Gottlieb are including this tool in their upcoming October 2024 publication Collaborative Assessment for Multilingual Learners & Teachers.
ACCESS Goals Setting Conferencing Tool
Upcoming publication by Margo Gottlieb & Andrea Honigsfeld which references the tool
As we conference, I follow the tool from the top down. I begin by explaining how language research shows that it can take 1-3 years to become proficient in social language and up to 5-7 years to become proficient in academic/ content language. This is key in situating long term growth expectations. We then discuss score history. Next, we revisit the most current level of language proficiency disaggregated by domain and overall. Scores may seem grossly off compared to the expressive language currently demonstrated in the classroom since those who have an ACCESS score took it a full calendar year prior. Or scores may mirror incremental growth. It all depends on the individual language journey. Last I ask my student to select one domain as a goal that the student in particular would like to increase. Then I also select a domain as a goal–usually (but not always) it is a different domain based of what I see the student can do in class. It’s a way I validate how I notice and consider in-class performance and efforts.
Check out what my dear friend and colleague Glory wrote. She used the tool for the first time the 2023-2024 school year.
Last – How do I get to my destination?
Upon receiving the scores, my student and I will once again conference 1:1. I am fortunate that in Virginia we receive our results in May/June. Usually this is a good time to touch base on their linguistic progress but also their academic progress and tentative scheduling for the next year. Students get very excited and will demand their turn. There are always aberrations that can be disappointing. This past year 2 students had microphone issues which dramatically lowered their speaking scores. Some had an “off” testing day(s). It opens the door to the conversation that we aren’t our test scores. Annual proficiency testing is a great tool for measuring annual progress, and it is just that–a tool. But most demonstrate progress in some capacity, and we celebrate.
I simply enjoy sitting with them individually and having a conversation before the summer break or for my graduates, talking about life after high school. Language learning is a process–it’s a beautiful process–and so are our relationships with each other. These 1:1 conversations have become my favorite times of the year. I’ll leave you with an example in use.
While some students may be familiar with how they use AI in their everyday life, it’s important to never assume a baseline of background experiences. Shout out to Scholastic Action Magazine for an absolutely engaging article on ChatGPT and how we use AI in everyday life with Alexa, Siri, Youtube Recommendations and more!
Pair Reading about Content with a Strategy
Their article Could a Chatbot Write This Story? builds background and context and then includes the comprehension questions pictured below. The comprehension questions are comprehensive! They establish a solid understanding of what ChatGPT is and provide a framework of how other Artificial Intelligence may work.
Scholastic Action’s comprehensive questions based around WH- questions are simple, comprehensive, and accessible for English learners.
My newcomer to advanced students all engaged these questions. While this series is primarily a content series on AI, this post focuses on an English language development strategy particularly useful when we build prior knowledge with reading & answering comprehension questions. It is key for EL teachers to combine content with functional cross-curricular strategies that students can leverage across their content classes.
After a read through, I taught the Sentence Mirroring strategy. This is how Tan Huynh, a prolific ML teacher and author, references it. In the past, I have called it the “Start with the Question” strategy but will change to Huynh’s term Sentence Mirroring because I love the imagery of a mirror, how the student creates a reflection of the question in the answer. It requires no prep, simply instruction on the part of the teacher. It is iterative and can be applied later on to any other questions/responses.
In this strategy, we teach students to use the question to create their own sentence starters. The question itself is a built-in word bank. This tool is absolutely empowering to students. They don’t need a teacher to provide them with the sentence starter–they create it themselves. Equally powerful, it teaches the student to examine the question’s content before attempting to answer it. Further, it reinforces word order, pronouns, and spelling. This is how I approach it:
How to Employ the Sentence Mirroring Strategy
Read the question. Reread the question.
Number the first word in the question to start the answer, then copy it in the answer space.
Continue to number the second, third, fourth word etc in the question to continue the answer, then copy in the answer space.
Read the newly created sentence starter for clarity. *This is where students can check for pronoun changes like you to I and identify any word order corrections.
Sentence Mirroring in Action! (Enjoy the pun) 🙂
At that point, the students answered their questions searching the text and their own sentence starters.
Now Apply & Code in Scratch!
We weren’t done! I then used this exercise to introduce basic coding to my students in Scratch, a free web-based coding platform designed for students to explore coding their own interactive games, stories, and animations. The task was this:
My beginners/ early intermediate students coded one character (a sprite) to share their answers from the ChatGPT article in a monologue.
My upper intermediate/advanced students coded two characters (two sprites) to share their questions and answers in a dialogue.
See a beginner/ early intermediate student example here.
See an upper intermediate/advanced student example here.
Students created and customized. They revisited and reviewed the content. They interacted with English Language Arts concepts, conversational discourse conventions (do we talk in sentences? or phrases?), and engaged basic, traditional computer programming. They had a blast and are well ready to engage foundational principles behind AI. We’ve just scratched the surface of this unit.
AI Aboard!!! Duh duh. Duh duh. Duh duh, duh duh. AI AI AI!
Teachers and students are jumping on the ‘crazy train’ on how to teach with and use artificial intelligence (AI) for learning, but what about learning about AI.
It is important that students with different cultural and linguistic perspectives learn about AI and its foundational principles to ensure that they get appropriate representation as AI tools and ethics are being formulated and regulated. Equity for EL students will mean a purposeful and even tactical emphasis on the foundations of AI by local educational agencies, especially now as our world is burgeoning with new AI technology and considering its implications.
I tell my students, “This is your ‘when I was your age’ moment. For me, ‘when I was your age’, I had no texting capabilities on my phone, certainly no internet apps or camera capabilities on my phone. For you, you will tell your children, 20 years ago… AI was just emerging and… I was in high school and Ms. Sawyer taught me all about it! LOVED HER. Wonder where she’s at? Ha!”
As EL teachers, we can help our students climb aboard. Understanding and bringing their diverse voices to this transformative technology is crucial. We must adapt our content-based instruction as the content adapts. This is the language of computer science, of social studies, of current events, of now.
This March I had the privilege of leading a small cohort of my colleague-friends in a introductory PD on how to teach our secondary EL students about the principles behind AI. My Maryland friends from the Maryland Center for Computing Education and a PLC of like-minded educators presented me the opportunity to host sponsored by the Scratch Education Collective grant. It was an honor to be selected to run the secondary portion of the grant and bring computer science PD home to Chesapeake, VA.
This will be the first in a series of posts that document what we did to introduce Scratch and foundations of AI technology to our EL students. We explored activities and brainstormed language acquisition supports that would bridge access to the content. All of our units looked similar yet different as we customized the activities and learning to our classrooms. 3 of 4 EL teachers had limited to no experience integrating computer science in their classrooms, but that soon changed!! I was also new to facilitating my students in their exploration of the foundations of AI and learned alongside my English learner teachers.
Let me leave you with the introductory lesson I implemented.
It begins the “Great Cognate Race,” where deductive reasoning is used to create a formula for Spanish to English connections. The focus word was ‘intelligence.’ Students race to list as many words in their home language that end in -ancia or -encia. Then I list the English equivalent. Students deduce a rule based on their data, and use it to convert their cognates to English. This activity honors the home language and how their expertise in Spanish can serve as a ramp to equivalent English vocabulary. It is similar in principle to artificial intelligence. Machine learning considers broad data to set parameters to later produce specific results.
Next we explore human v. machine. The purpose is to show students the value of their own experiences and expertise–to rip them away from the over-dependence of computer influence and also introduce how computer learning can be used to expand–not replace–their own work.
Students brainstorm the meanings of the words ‘artificial’ and ‘intelligence.’ We use their answers to create a definition using the stem “Artificial intelligence is________.” Ss share their definitions. Then they copy down a dictionary or AI generated definition. They reflect on how their own definitions were similar or different. Last, they combine elements of both to create a “master” definition. Instead of human v. machine, human AND machine.
Human 💪! Machine🦾! For our intro to #AI unit, Ss 1) brainstorm meanings of ‘artificial’ then ‘intelligence’ 2) Co-create a class—human—definition, then 3) look up & record a @ChatGPTapp definition 4) reflect & analyze 5) combine elements to create a blended, master definition. pic.twitter.com/TQd7h1vJ87
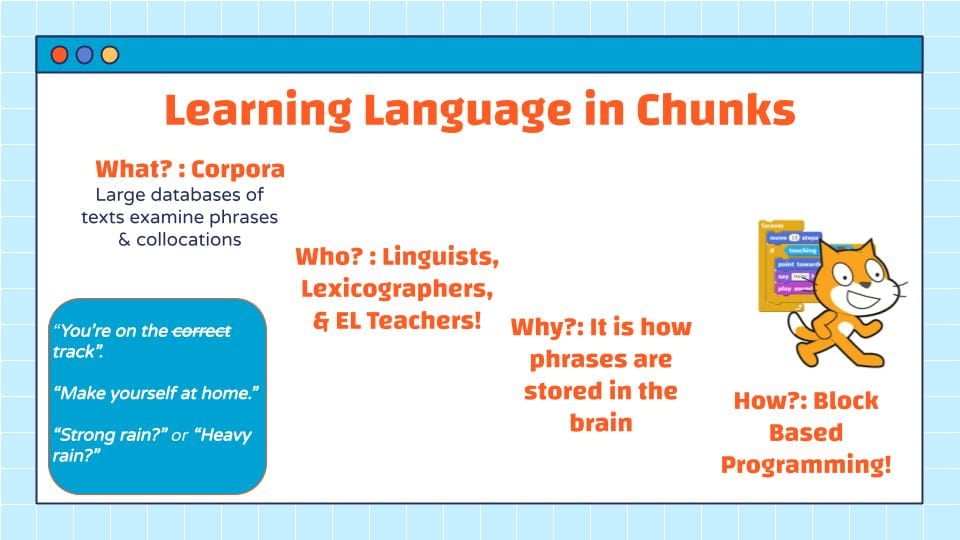
Often when we think of a world language lesson, we remember vocabulary lists and grammar rules. Language is also stored in the brain in chunks and semantic groupings.
Word up!
What are chunks? Ben Zimmerman describes it as “meaningful strings of language that are committed to memory. Chunks may consist of fixed idioms or conventional speech routines, but they can also simply be combinations of words that appear together frequently, in patterns that are known as ‘collocations.’ (Nytimes, 2010). The WIDA standards, the K-12 language standards adopted by 42 of 50 states, note increasing competence in expressionsand phrases as a mark of growing fluency in its vocabulary/phrases usage column of its interpretive rubrics.
Linguists utilize corpora to analyze large data sets to identify these collocations and patterns of words for research. (Sound familiar, computer scientists?) For EL teachers, the implications are that we should leverage this science how the brain stores language in phrases and explicitly teach language phrases, chunks, and idioms. It’s a well established approach in second language acquisition, “The Lexical Approach,” first introduced by Michael Lewis in the 90s. He calls for traditional language teachers to reject the traditional vocabulary/ grammar dichotomy and reimagine the language classroom (T-ESJ, 1997).
So let’s re-image the language classroom and take it a step further with computer science integration. Here’s where block programming comes in. Lines of code, that is, meaningful strings of language, are chunked in blocks. Students participate in reading and acquire language in chunks as they manipulate the blocks. Beginning programmers can easily code by dragging and dropping these blocks in an algorithm, which fit together like a puzzle. They test their code and receive instant feedback how they use the blocks of code phrases/ chunks of language as they test the code. And repeat. As sung by House of Pain, “Word to your moms, I came to drop bombs”–
–No longer do we teach and learn from just word lists.
Visual programming languages, like Scratch, go even further. They add another visual element by color coding the blocks according to their functions. Color further embeds the language in the brain. When learning language, we know that phrases related to visual experiences are stored together. Computer scientists will describe a benefit of visual programming is for ease of use. Psycholinguists would describe how the brain works this way too—we chunk language for ease of use. Linguist Schmitt in his 2000 article in ELT teaching, describes this: “There is less demand on cognitive capacity, because the lexical chunks are ‘ready to go’, and require little or no additional processing.” And, color coded chunks, works with the brain for learning language.
There’s a lot more to be said for this connection between chunking and the benefits of exploring and creating with visual programming blocks for English learners. It is my firmly held belief that integrating visual programming projects to teach language could be transformational to the language teaching community. With a teacher as learner mindset, our classrooms can be labs for innovative language teaching and learning. As for me, this connection is a huge motivator to continue to integrate CS in English language development instruction!
After exploring plants in our environment, I wanted my students to understand how technology, robotics, and automation impacts our world and more narrowly, can be leveraged by farmers, engineers, and scientists and even hobbyists to take care of nature. We began our Micro: bits unit.
First off, I’d like to thank Tim Dixon, Dianne, and Elissa from SEC, Prince George County Public Schools, Maryland Dept of Ed, and the University of Maryland for introducing me to Micro: bits and sponsoring a class set! We are aligned in our passion for bringing computer science to English language learners and I look forward to more collaboration! Getting to know them and other amazing Maryland educators & CS researchers regularly has been an absolute highlight of this past year.
Micro: bits are small, programmable devices that can be used to teach students coding hands on. To introduce my students to them, we explored some easier projects before extending to the Self Watering Plant project. All projects and tutorials can be found in MakeCode.Microbit.org. We began with programming the light sensor–LEDs. Students programmed a flashing heart– then the letters in their name.
We’re deep into our unit on Micro: bits in #ESL! This week we are exploring 💡 light sensors, 👣accelerometers, ☀️temperature, and now 🔋 electrical currents that measure soil moisture 🪴❤️ Integration of #computerscience with language for science means #CSforall! @microbit_edupic.twitter.com/Wtpq8N3AiI
We watched the accompanying video in Edpuzzle and learned about the three functions of the LED: indication, communication, and illumination. Next, the students programmed the step counter project. In pairs they tested the Micro: bit by going to a designated location in the school–one student walked with the Micro:bit in their shoe and the other counted. They returned and learned how the accelerometer (motion sensor) is not very accurate and could be more sensitive. We then learned from the video in Edpuzzle that our phones also use accelerometers to rotate the screen! The third project was to program the temperature sensor. We had one student download the Room Temperature Thermometer app to compare the temperature data from our Micro: bits against the app. (Note: It’s only available for Androids–not the iPhone. I learned the hard way!) We began in our room, which anecdotally had the coldest room in the school. The first greeting upon entering into our room has devolved from “Good morning Ms. Sawyer!” To ‘It’s cold!!!” We went on a walk around the school– recorded the temperature in 5 different places, and returned to discuss our findings. Yep–room 207 is the coldest room in the school! The accompanying video taught us that the heat sensor is located in the processor which can skew the data–same with a phone’s heat sensor. Further-we know the technology behind why our phone’s black out at the beach!
Finally, Project 4 which grew from one project into a more complex version of the project. First we measured the soil moisture using electricity–there is no water sensor! We learned that when water and nutrients mix–they can carry electricity—and we can measure that electricity to determine if the soil is moist or dry. The students recorded their data. Then we expanded upon that project to create the complex Self Watering Plant project. As a class, we coded the project together, discussing precision and accuracy. Students checked their code line by line making sure their inputs were correct, practicing editing/ debugging skills. Then the students independently watched the tutorial on how to build the machine–pausing where needed. We came upon some frustration with the motor (the servo). We learned the hard way that if the lever isn’t positioned in the exact way the screen shows us, it will stall out. This caused a lot of frustration, but we did it–and I myself was surprised at how accomplished the students felt. I thought for sure this would be their least favorite project because of its length and intensity, but for many it was their favorite. This was my lesson. Kids like to do hard things!
#EL students explore the language of math and science as they measure 📏 soil for its dryness and code a Micro: bit to become a self watering plant machine! 💦🌱🪴🌏@microbit_edu#CSforallpic.twitter.com/Tb7ESWCGe5
To reflect, the created a one-pager in a Google Slide (inspired by ELL 2.0) on the Micro bits: They listed the 4 projects, discussed their favorite project & why, discussed their least favorite project and why, and one they’d like to try in the future. They were to list 3 new words, include an image that represented the unit, and emojis.
This integrated unit was a hit! We learned the language of ELA, the language of science, and the language of technology and coding. We learned to express preference, reflect, follow directions, check for accuracy, make conclusions based on data, and explore our environment. We learned how to persist when there’s an error and more. The engagement was unparalleled–my students even forgot that we were learning and using English to learn about, execute, and analyze these functions! Like our plants, we grew.
🗣”Can we do more with Micro: bits, Ms Sawyer? I began coming to school on time because I love them.” 🤣
On a warm sunny fall day, I took my students outside to take pictures of 10 or more plants around the school. They worked in pairs. One snapped photos with their Chromebook and the other wrote attibutes and details they both noticed about the plant. The appreciation was deep–first to get outside and soak in the autumn sun, second to learn more about the plants that we see daily around our school environment.
The next day I taught the students how to created a folder in their Google Drive, upload pictures, and share the folder with their partner. After completion, they worked collaboratively to complete a table with their plant data, exposing them to another type of graphic organizer and its function. They reverse searched their plant pictures in Google lens to identify the plants. With that information they could research the other questions in the table.
Multiple Meaning Words: Language Learning Support
I used this word “table” as a catalyst to discuss multiple meaning words, which can often be tricky for second language learners. I asked, “What does ‘table’ mean?” They immediately responded, “Mesa!” “You’re not wrong, but in English ‘table’ can mean something different depending on the context. In this context, a ‘table’ is a graphic organizer, which organizes information in rows and columns. In Spanish, it is called a ‘tabla.’ So how do you know the difference? Well, would you eat at a graphic organizer? Not really. It’s the context which tells us which ‘table’ is being used. But let’s table multiple meaning words for now.
Writing: Research
The students then worked together to research the plants.
Completing a table
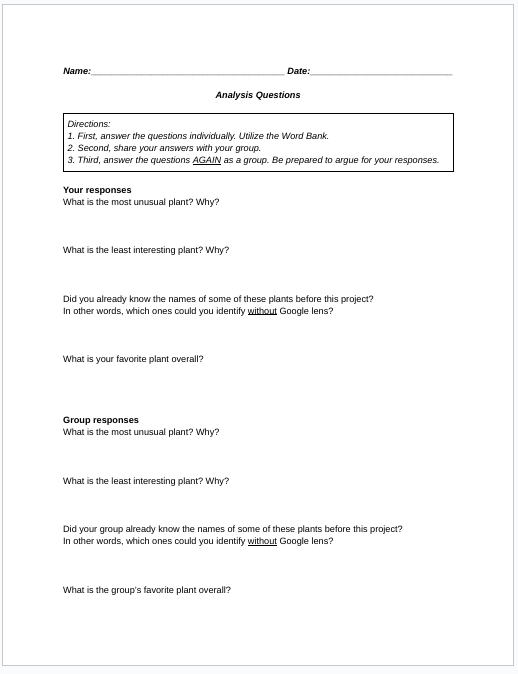
Upon its completion, I gave them the short think, pair, share reflection assignment below. Referring to their data, students had to write their individual opinions. Then, they orally discussed their individual opinions with their group. Last, they had to decide on a group response for the same questions then present out. One student remarked–I love this project! My favorite question was which of these plants could you identify without Google lens? And aside from pine trees and tomatos, most all were new. They deepened their vocabulary, learned technology, grew an appreciation for local Virginian flora, and collaborated in their written and oral responses.
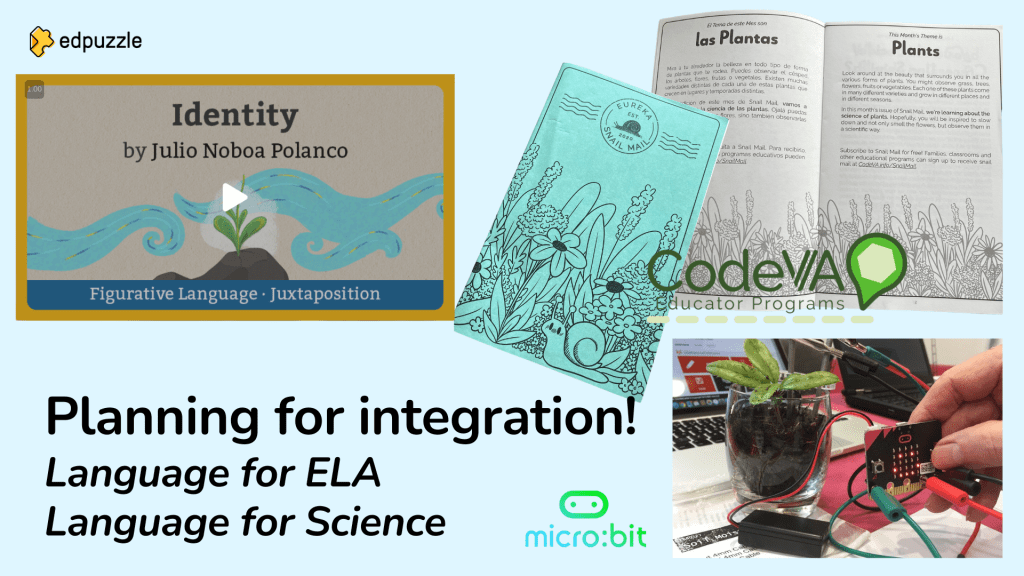
As integrating computer science has taken root in my ELD classes, I constantly look for the next WIDA standards/ CS opportunity. My goal is to integrate a minimum of one computer science project a semester. My inspiration for this unit began with a seed–CodeVA’s bilingual snail mail issue #21 on plants & simulation* (Language for Science & CS).
* CodeVA issues free bilingual, accessible booklets that students can have mailed to their homes. Who doesn’t love getting mail? Teachers can also use them, of course! Sign yourself up & encourage your students to sign up too!
The conditions for this unit’s germination were soon met! Edpuzzle’s featured video on Julio Noboa Polanco’s poemIdentity/ Identidad for Hispanic heritage month (Language for ELA) was a perfect collab, and with Microsoft’s Make Code‘s project to create a self – watering plant with a small, programmable device Micro: Bits, we were ready to grow in our knowledge of plants/ germination conditions, poems/ identity, “I’d rather___ than___” preference sentence structures, and how computer science can aid in agriculture.
The unit was over three weeks. I’ve divided it into 3 parts.
Part 1: Prior Knowledge & Language for ELA: Julio Polanco’s poem Identity/ Identidad:
The students will brainstorm and translate the names of known plants and create a class botany word bank.
The students will diagram a named plant and generate 5 reasons why they would be them completing the frame “If I were a plant, I would be a _____.”
The students will demonstrate an understanding of negation and diagram a named plant and generate 5 reasons why they would not be like the named plant by completing the frame “If I were a pant, I would not be a ______.”
The students will demonstrate an understanding of a Venn Diagram and its use by completing a graphic organizer comparing and contrasting flowers and weeds.
The students will read and demonstrate an understanding of text structure.
The student will understand juxtaposition by comparing and contrasting plants they would or would not be like by using a Venn diagram.
The students will rewrite a poem inspired by Polanco’s identidad to reflect their own identity.
The students will verbally share their project by presenting to classmates.
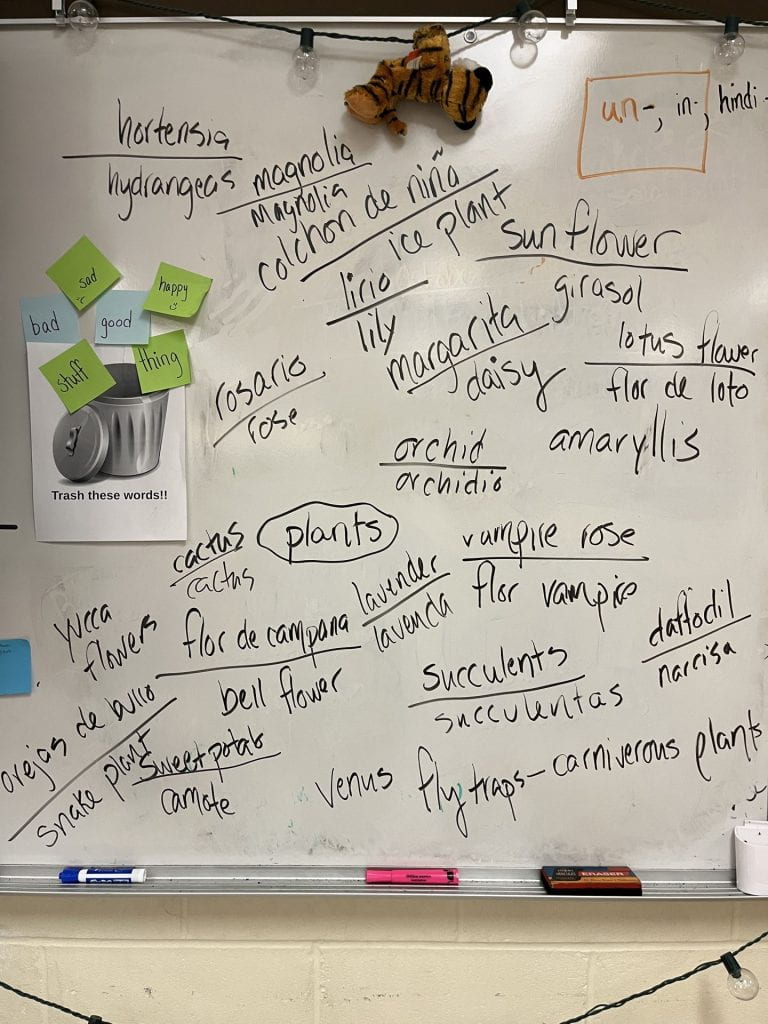
Prior Knowledge/ Vocabulary Builder
First, we brainstormed plants in both languages–looked up images and translations. I put them in a Quizlet set for us later to review. Daisy is margarita, in Spanish, you guys! A fun fact to impress your friends at Mexican.
Co-constructing word banks are a great way to tap into prior knowledge and expand vocabulary in the L1 as well as English!
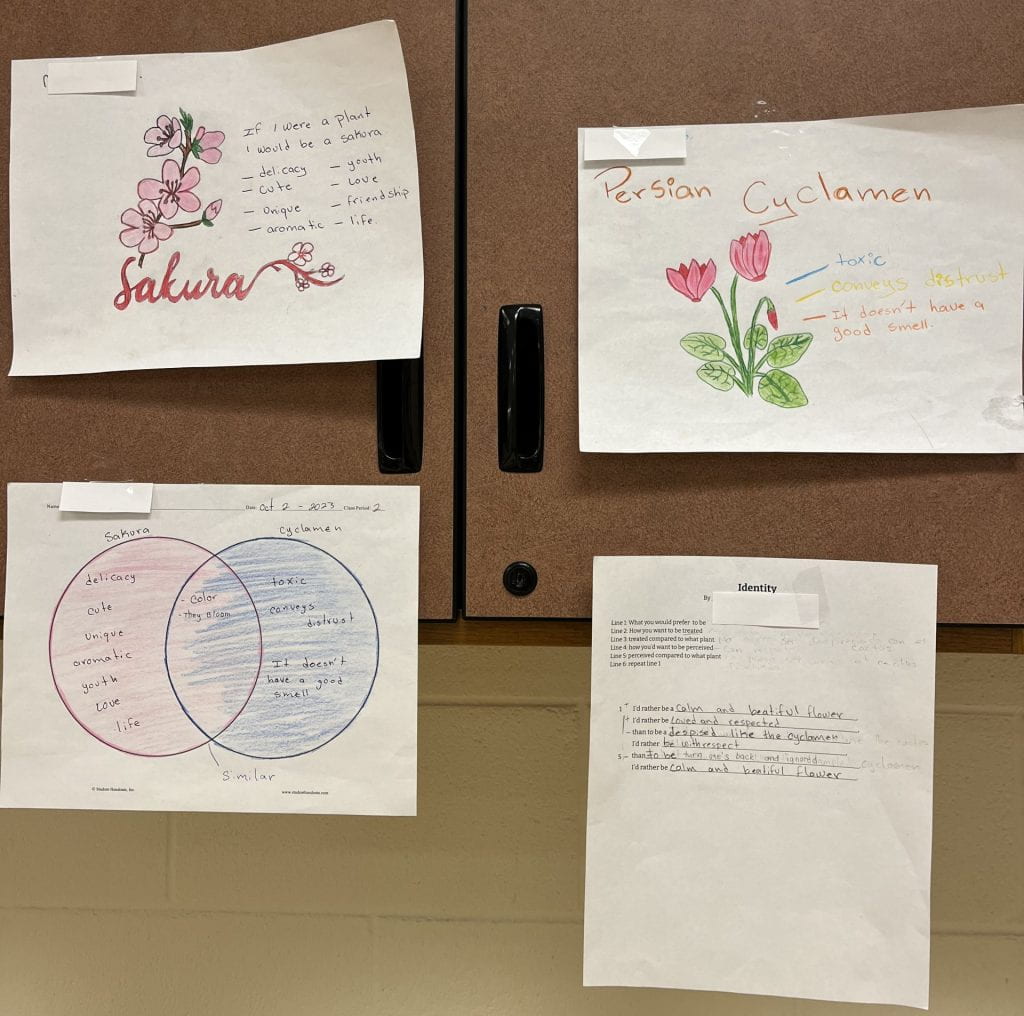
Second, I introduced the subjunctive: If I were a plant, I would be a _________. Students researched & drew the plant and wrote 5 descriptors why.
Next, the negative: If I were a plant, I would not be a _________. Students researched and drew the plant and wrote 5 descriptors why they would NOT be that plant.
Then I introduced Venn Diagrams. Note that it is important to describe what a graphic organizer is, how a Venn Diagram is a type of graphic organizer, and its purpose. For many of my students, this was their first encounter with a Venn diagram. We shaded each circle with a different colored pencil and the middle, overlapping part holding both colors. We wrote the word “differences” under the outside parts of the circle and similarities under the middle part. We co-constructed their first Venn Diagram. We brainstormed how a flower and a weed were similar and different. The topic was flowers and weeds, to preview Polanco’s Identity/ Identidad poem.
Next, they independently created a second Venn diagram based on the two plant diagrams they created in prior lessons to demonstrate that they understood how to compare & contrast utilizing one.
Reading
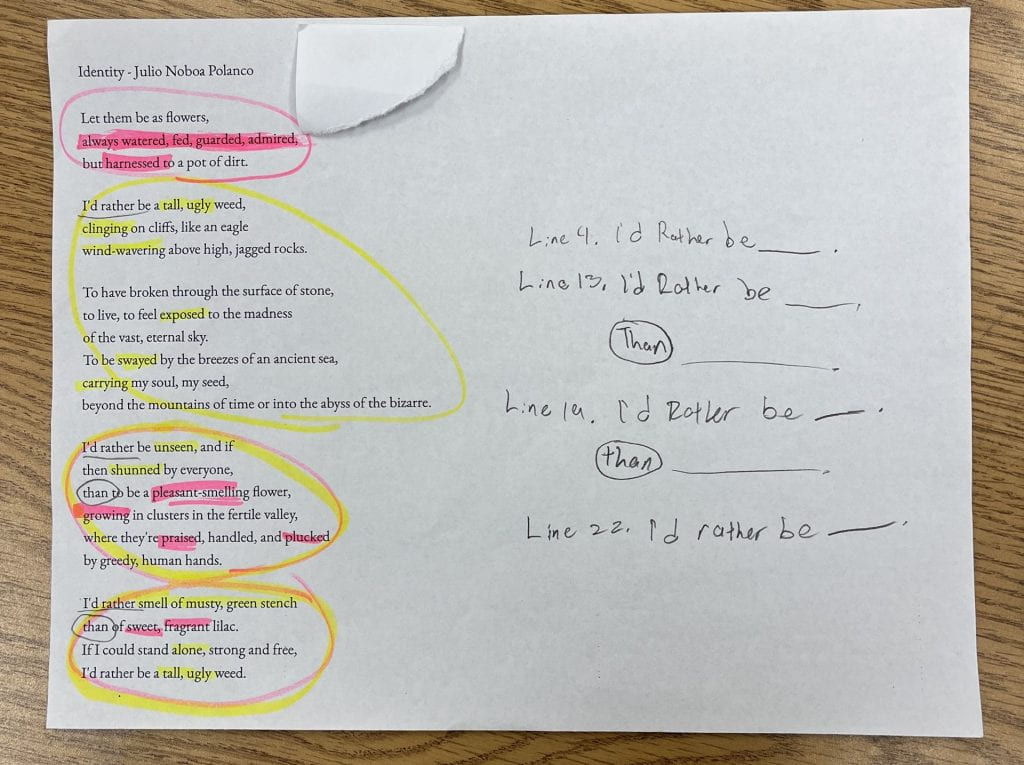
I generated interest–Polanco was 14 years old when he wrote this poem and it’s his most well known. Why did he write it? His girlfriend broke up with him!! How do you think he felt?
Students read and reread his poem in Spanish and English. Advanced students only entered into the Edpuzzle video–I found it to be a little extensive for beginner/ intermediate ELs.
Then with two different colored highlighters, they highlighted phrases/ words in one color that referred to the flower, in the other color that referred to the weed referencing the versions in two languages.
We noticed his poem’s stanzas had organized themes: Stanza one, the flower. Stanza 2 & 3, the weed. Stanzas 4 & 5 comparisons between the flower and weed.
We underlined the repeated line “I’d rather be______.” How many times did he use this?
Then we circled “than” which follows “I’d rather be” in the second and third uses. We conducted a comparative linguistic study and considered the Spanish equivalent “Yo prefiero ….. que…”
The students had created their own writing assignment with sentence stems!
Writing: Poems
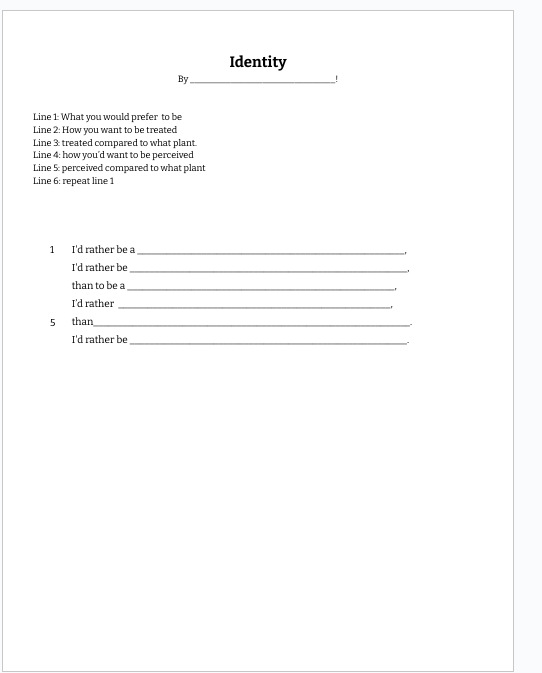
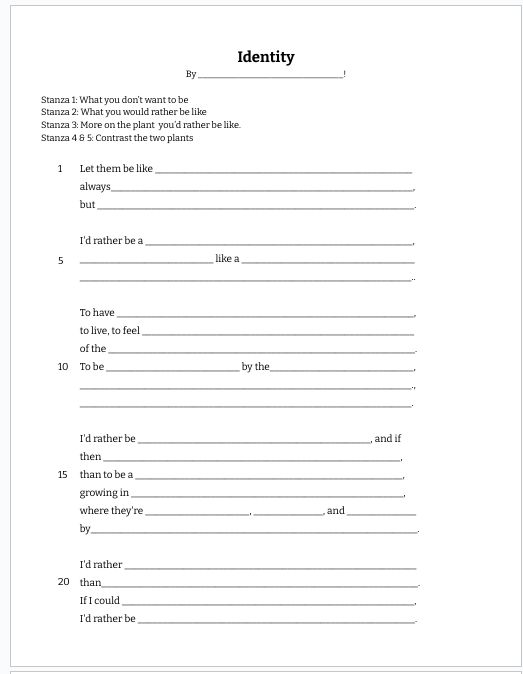
Beginning students completed the poem frame with the information from their original two diagrams. Upper intermediate/ advanced students completed the more extended poem frame.
Kahoot reviewing then vs. than! I taught a trick– Than has an ‘a’ and comparison has an ‘a.’ Then has an ‘e’ and sequence has no ‘a’s, but ‘e’s.
Listening & Speaking: Round Robin Presentations
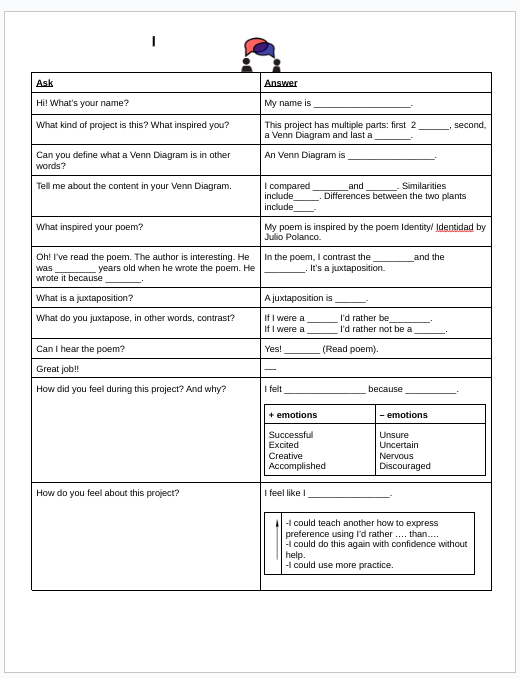
Students presented their poems and diagrams to each other as a capstone to this part of the unit in a round robin- style presentation. They posted their two plant diagrams, the Venn diagram comparing the two, and their original poem based on Polanco’s Identity/ Identidad. They had four minutes to make their way through the language guide linked below and they’d present to the next classmate in another four minutes, and so own guided by the timer.
Feel free to use my materials below! Let me know if you implement this unit– I welcome feedback! Look for part 2 and 3 coming soon.
Hot off presses in the September 2023 issue of TESOL Connections!
It was so much fun to write on this piece with @KDudaMiller on risk taking in #STEM for language learners! Here it is in the newly released September edition of TESOL connections for @TESOL_Assn members-check it out!👾🎮 pic.twitter.com/PXzggB1Ztf
At the end of the school year, my friend and colleague Katie Miller and I were approached by TESOL Connections to write a piece based on our TESOL Int’l Portland presentation Try, Fail, Succeed, Repeat: Taking Risks in STEM.
It’s my first publication since grad school and first ever co-authored. It was a dream to write with Katie. Here’s to firsts! It’s amazing how words and ideas pull together cohesive when you have first hand knowledge, experience, and excitement!
I am THRILLED to have the honor of joining the amazing CodeVA nonprofit as a faculty facilitator!
Here we go!
Their mission is to bring CS education opportunities, resources and training to make CS equitable to all Virginian children. What a perfect match. A special thank you to Kristin Hott and Megan Graybill for connecting me with this opportunity! I am excited to learn from like-minded educators and share my passion for integrating computer science in English language instruction. I haven’t left the classroom! I’m still an ESL teacher! In fact, here’s my personal goal to expand my #CS teaching toolbox for project based learning this year in my classroom:
This year’s goal is to explore…. Micro:bits! A Micro:bit is like a mini physical computer board which combines coding, craft and creativity to teach physical computing, engineering, computer science, and electronics. I have the Invent to Learn Guide to the Micro:bit book but am closely following Micro:bits on Twitter/X for integration ideas.
As a computer science learner myself, how do I select what to platform to use and for what?
I select one primary platform to explore and integrate in a unit project a minimum of once a semester. I do this 1) to keep me focused and 2) also to provide continuity for my students. Unlike most high school teachers who have their students for one semester only, I have the privilege of teaching & keeping mine throughout their tenure. This means that I do try to avoid duplicate learning experiences and units for the same set of students.
I don’t limit myself, however! If a compelling CS integration opportunity arises like it did with our World Cup unit, then we’ll go for it. For example, after an introductory project or two first semester with micro:bits, second semester I want us to use both the Edison bots and micro:bits in a project where the students put on a parade on a yet to be determined subject. I’m fascinated by this re-tweet.
On parade! 🚗🚗 a new way to utilize our @MeetEdison bots and employ creativity! Floats could be a variety of topics-book chapters, article summaries, or more! #ESL#EL#ML#PBLhttps://t.co/i6ycMsomlM