Intro to Video Game Design. Sound fun? Dooot dooot dooot doot doot DOOOT! Look for upcoming posts on a unit that’s been brewing in my head for a year.
I was exploring Code.org’s CS Discoveries course and they recommend to begin a video game design unit with the first three lessons on problem solving in computing. In this unit, students collaborate and communicate. Through experience, students learn the 4 steps of the problem solving process: define, prepare, try, reflect. Students learn to modify and adjust based on research and experience. They write and record their answers and then extend the process to a variety of problems and puzzles. Check them out here.
Their first lesson is a challenge. Several possibilities are presented:
- Students work together to create the aluminum boat that can hold the most pennies.
- Students work together to create the tallest paper tower using only 20 sheets.
- Students work together to create a bridge out of spaghetti that can hold the most books.
- Students work together to build a newspaper table that can hold the most books.
We made paper towers. My students worked in groups of 3. Who could create the tallest paper tower using only 20 sheets in 15 minutes? Before I set the timer, they had 5 minutes to record on chart paper– Step 1: define, & Step 2: prepare. Step 1 was crucial to the project and I fielded lots of clarifying questions. Can we use pegamiento (glue)? Nope. Just paper. What about grapas (staples)? No, only paper. Then the laughing. How in the world! With step 2, there was more of a need for help. With them excited to begin, I held my rooms of 18 teenagers the best of my ability and encouraged them to draw a diagram or write some key words and phrases of what they would attempt.
Ready, set, GO! They should have trusted themselves. Within minutes they were folding paper, experimenting with 3D shapes, considering reinforcement, balance, and surface area. They were laughing, sneaking looks at what their friends were doing in other groups. “It’s okay to do that guys, you are researching designs and outcomes!”
To finish, students wrote their reflection on how it went. This provided a great opportunity for those who were a little more reserved in the process to contribute. This activity elevated creativity, technique, and design, highlighting often hidden assets of some more quiet or beginning students.
Day 2-3: Idiom Challenge & Puzzles
I introduced Problem Solving Idioms in a Quizlet set. Even though idioms are an advanced skill, my beginners and intermediate students are capable. Additionally, they need exposure and I have some who are leaping up into advanced proficiency and I wanted to challenge them. Then I challenged my 2 beginner/ intermediate classes to a competition. I also challenged my other 2 classes of advanced students to their own competion. The rules were simple. Any attempts to verbally use the idioms in their speech the most before spring break wins donuts. Let’s get back on track!
Back to problem solving! We reviewed the problem solving process with a listening activity in Edpuzzle, which embeds comprehension questions on Code.org’s video of this process in the business world. Then we attacked their puzzles. Thank you, Code.org for your engaging materials!
First, a Word Search. We made cross-linguistic connections. In Spanish, it’s called “Sopa de Letras” or “Soup of Letters.” The Spanish paints a visual for me! Familiar to all, I found that they hadn’t stopped to think about the prepare/ plan step. What strategy do they follow anyhow? There were a variety of responses. I set a stopwatch. And once again, we timed ourselves to see who finished fastest. It was exciting to see students shine.
Then we filled out the problem solving table for the Word Search.
Next, a Birthday Party Seating Chart. Ah my teenagers could identify here. All the friends are invited but some pairs are fighting and some want to be seated with their BFF or novio(a). I modeled. I “sat” the first pair and “separated” the second pair of exes, then released the students with a stopwatch to see who finished fastest. Then they filled out the problem solving chart in the back.
Day 4: Prep for Problem Solving Journal
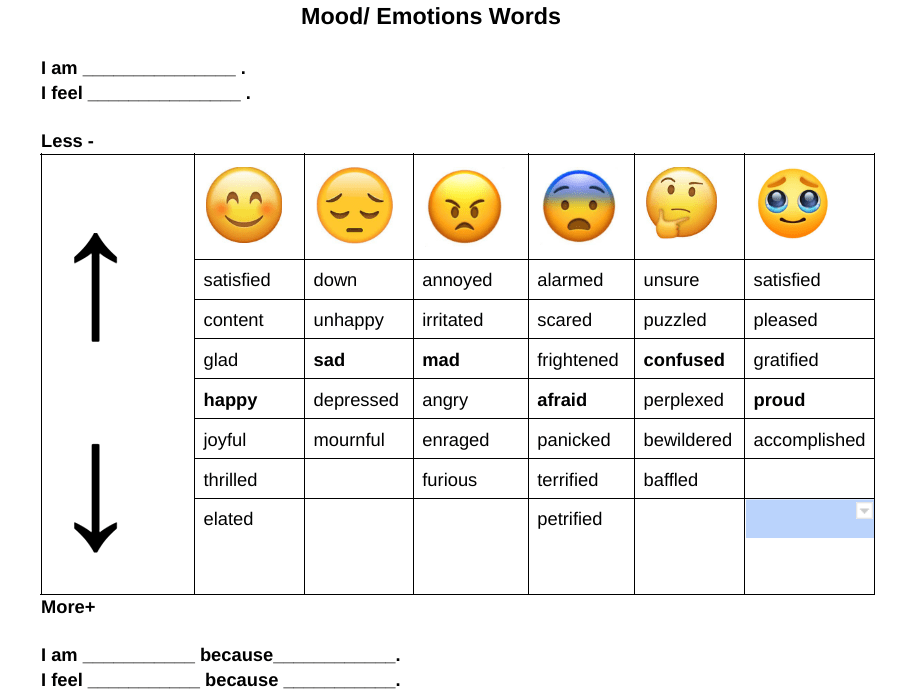
I had the students create their own problem solving journal with a colored sheet for a cover, 3 sheets of white paper, stapled, with their first page, re-written as a guide. We will use this for our video game unit to record the application of the problem solving process, Step 4, “Reflect” to be guided by an insert Mood/ Emotions Table printed for their journal. Each page will name the challenge and the four steps will be completed, with support, by the student.
Extra!: The problem solving process has already crossed over into our other learning activities! Several occasions when reading, students have asked, how do I say this word? I refer back to the process. Step 3! Try! Then they smile and jump in with their attempt.