Game Design – The Gaming Story

Game Design presents opportunity to explore story elements. To lead into this unit, we built up our vocabulary, background knowledge, and made social/emotional connections with two Scholastic Action Magazine* articles: The History of Video Games and The Problem with Fortnite.

Afterwards… questions. Interest. –What are the basics of game design? How is it done? Do I have the ability to enter this world of programming and game design? YES, you do!

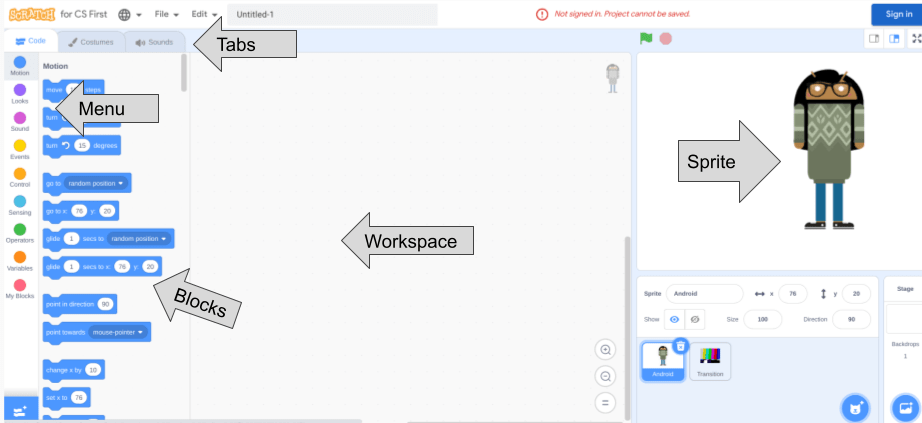
The unit begins with logging students in and exploring the platform. I introduced categories in the menu on the left hand side, discussed common computer science terminology, and we labeled the parts of the screen: menu, blocks, workspace, tabs, etc.

In Nearpod, students then label the parts of the screen.

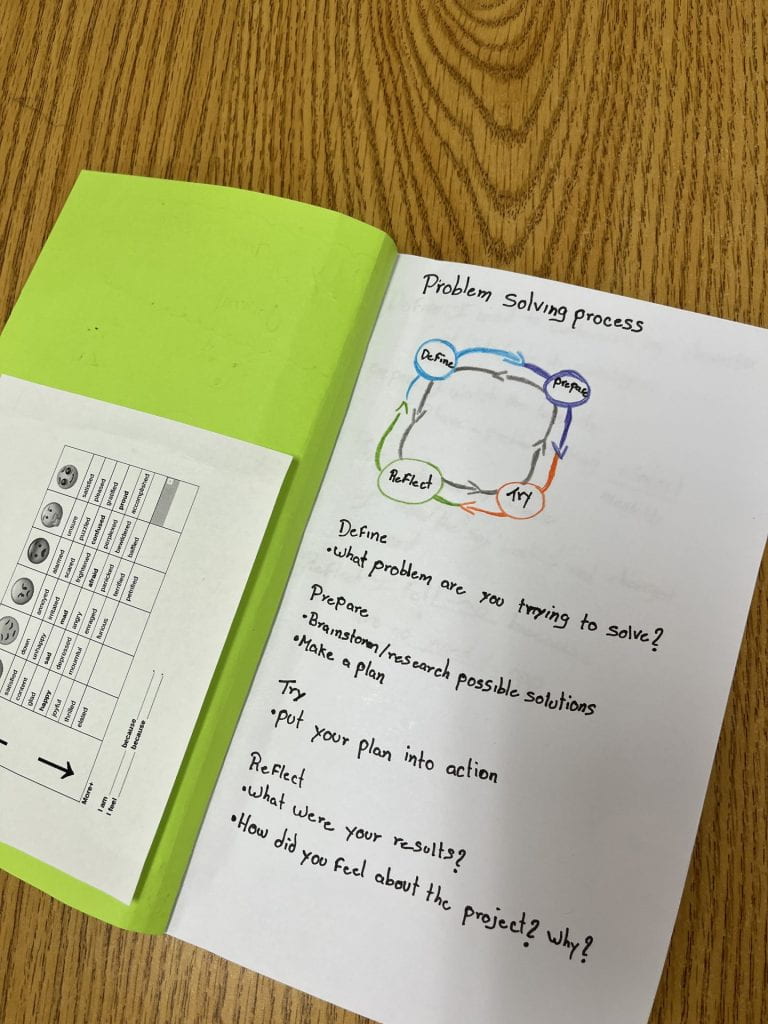
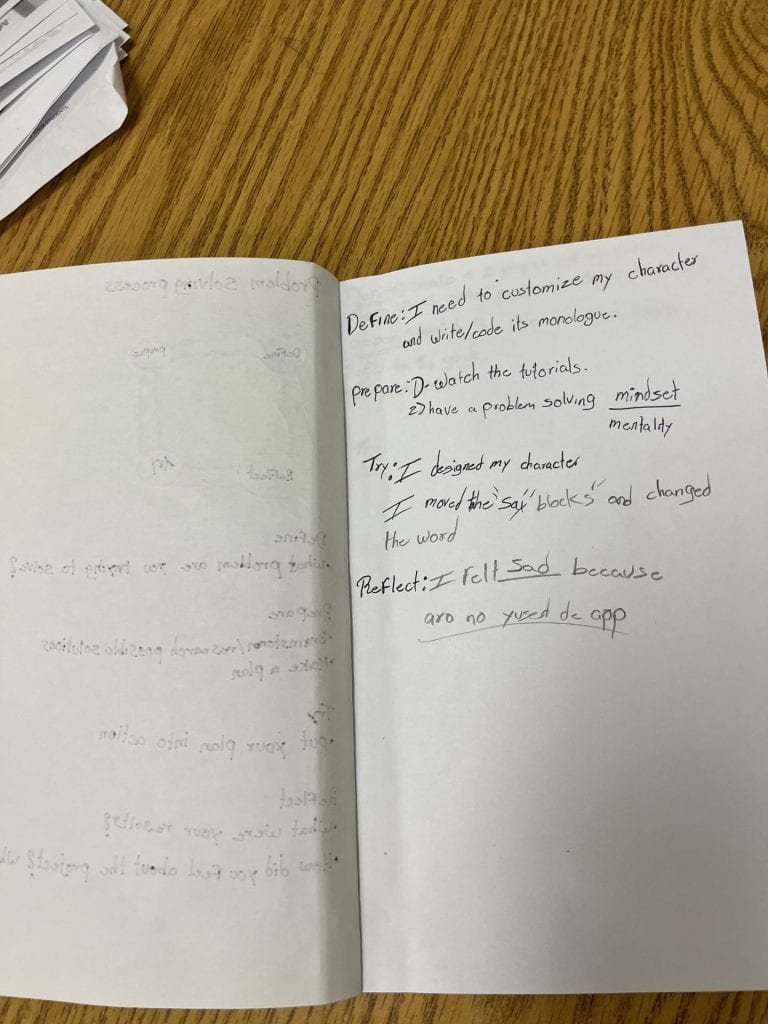
Also prior to coding our character to talk, we wrote in our problem solving journals. I modeled how we were entering into the problem solving process (define, prepare, try, reflect) that we learned in our prior unit inspired by Code.org here. Together we wrote down the first two items, define and prepare. Then later returned to try and reflect.

Define: Create a gaming story.

Prepare: 1) Pause & rewatch tutorial videos or 2) refer to the CS First’s Game Design Guide (printed for each student to reference).

Try: Design my character. Move the “say” blocks and change the word.

Reflect: I felt _________ because ___________.

Gaming Story

CS First in Google begins with the concept of the story behind the game. Every good game has a compelling story. I asked the class, what are your favorite games to play? What are their stories?

The CS First introductory video begins with a thought provoker–should students play more or fewer video games. To prepare to answer, we read Scholastic Action Magazine’s “Are Video Games Good for You?” I polled the students’ opinions. Beginner/ intermediate students stated an opinion. Advanced students explained their rationales. They all answered comprehension questions after the end of the article.

Scholastic Action Magazine’s Are Video Games Good for You? was a perfect intro to Game Design

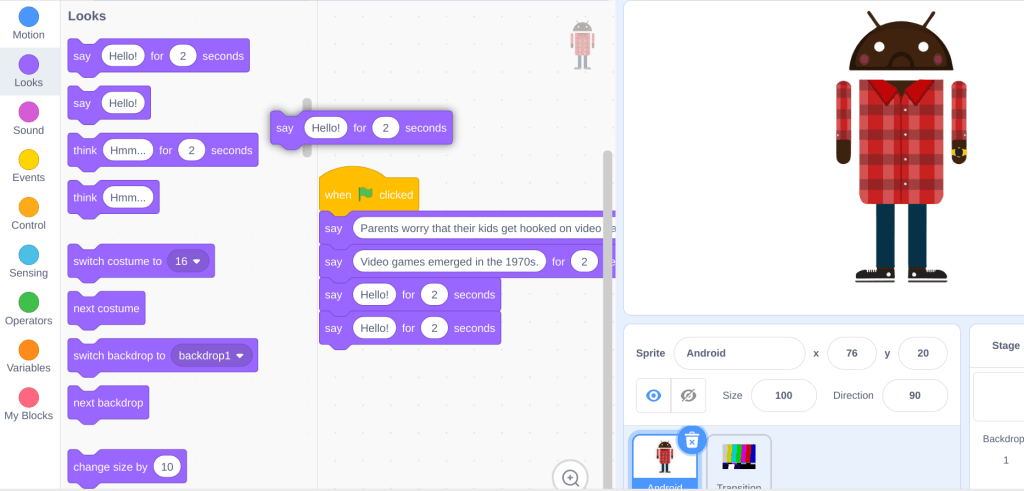
In this coding task, students customize a character’s clothing and features, and then code it to do one simple task–say something. Students replace “hello” by typing into a “say” block, which codes their character to speak.

What would the character say for this assignment? We utilized the answers from the comprehension questions that we wrote that followed the article. A character would say them.

See a student’s work in progress below. At this point, he attached four “say” blocks and rewrote what his character would say in the first two “say blocks.”

The student is replacing Hello! so his character shares the information he wrote in response to the article.

With only one primary block to identify, drag over, and modify, creating a gaming story was a nice, accessible introduction into the world of coding. Students with prior background in computer science who finished quickly further customized their characters with add-on tutorials.

This assignment extended a writing assignment into a different format. Code a character to summarize an article.

What else could a student code a character say? Some ideas…Code a character to give a tutorial. Code a character to relay greetings. Code a character to give a report. Code a character to teach a concept. Add a second character and turn in into a dialogue. The possibilities!

*As an aside, I absolutely love the language rich, highly engaging materials of Scholastic Action. I build many of our units of study based on their nonfiction feature articles. Units have included Comic Books in the Great Depression, Real Stories of WWII, Frankenstein & Fear, and Extreme Weather. I highly recommend subscriptions to them to add content related materials for reading, writing, listening, and vocabulary integration. Their digital subscription gives you access to all back issues and accompanying plans/ materials. Articles come with 3 different lexile versions usually 500-600, 600-700, and 800-900. For my beginners/ newcomers we work hard. We frontload and scaffold the articles identifying text features, analyzing images, and building background knowledge. Check them out!

No Problem! A Problem Solving Unit

Intro to Video Game Design. Sound fun? Dooot dooot dooot doot doot DOOOT! Look for upcoming posts on a unit that’s been brewing in my head for a year.

I was exploring Code.org’s CS Discoveries course and they recommend to begin a video game design unit with the first three lessons on problem solving in computing. In this unit, students collaborate and communicate. Through experience, students learn the 4 steps of the problem solving process: define, prepare, try, reflect. Students learn to modify and adjust based on research and experience. They write and record their answers and then extend the process to a variety of problems and puzzles. Check them out here.

Their first lesson is a challenge. Several possibilities are presented:

  1. Students work together to create the aluminum boat that can hold the most pennies.
  2. Students work together to create the tallest paper tower using only 20 sheets.
  3. Students work together to create a bridge out of spaghetti that can hold the most books.
  4. Students work together to build a newspaper table that can hold the most books.

We made paper towers. My students worked in groups of 3. Who could create the tallest paper tower using only 20 sheets in 15 minutes? Before I set the timer, they had 5 minutes to record on chart paper– Step 1: define, & Step 2: prepare. Step 1 was crucial to the project and I fielded lots of clarifying questions. Can we use pegamiento (glue)? Nope. Just paper. What about grapas (staples)? No, only paper. Then the laughing. How in the world! With step 2, there was more of a need for help. With them excited to begin, I held my rooms of 18 teenagers the best of my ability and encouraged them to draw a diagram or write some key words and phrases of what they would attempt.

Ready, set, GO! They should have trusted themselves. Within minutes they were folding paper, experimenting with 3D shapes, considering reinforcement, balance, and surface area. They were laughing, sneaking looks at what their friends were doing in other groups. “It’s okay to do that guys, you are researching designs and outcomes!”

To finish, students wrote their reflection on how it went. This provided a great opportunity for those who were a little more reserved in the process to contribute. This activity elevated creativity, technique, and design, highlighting often hidden assets of some more quiet or beginning students.

Day 2-3: Idiom Challenge & Puzzles

I introduced Problem Solving Idioms in a Quizlet set. Even though idioms are an advanced skill, my beginners and intermediate students are capable. Additionally, they need exposure and I have some who are leaping up into advanced proficiency and I wanted to challenge them. Then I challenged my 2 beginner/ intermediate classes to a competition. I also challenged my other 2 classes of advanced students to their own competion. The rules were simple. Any attempts to verbally use the idioms in their speech the most before spring break wins donuts. Let’s get back on track!

Back to problem solving! We reviewed the problem solving process with a listening activity in Edpuzzle, which embeds comprehension questions on Code.org’s video of this process in the business world. Then we attacked their puzzles. Thank you, Code.org for your engaging materials!

First, a Word Search. We made cross-linguistic connections. In Spanish, it’s called “Sopa de Letras” or “Soup of Letters.” The Spanish paints a visual for me! Familiar to all, I found that they hadn’t stopped to think about the prepare/ plan step. What strategy do they follow anyhow? There were a variety of responses. I set a stopwatch. And once again, we timed ourselves to see who finished fastest. It was exciting to see students shine.

Then we filled out the problem solving table for the Word Search.

Next, a Birthday Party Seating Chart. Ah my teenagers could identify here. All the friends are invited but some pairs are fighting and some want to be seated with their BFF or novio(a). I modeled. I “sat” the first pair and “separated” the second pair of exes, then released the students with a stopwatch to see who finished fastest. Then they filled out the problem solving chart in the back.

Day 4: Prep for Problem Solving Journal

I had the students create their own problem solving journal with a colored sheet for a cover, 3 sheets of white paper, stapled, with their first page, re-written as a guide. We will use this for our video game unit to record the application of the problem solving process, Step 4, “Reflect” to be guided by an insert Mood/ Emotions Table printed for their journal. Each page will name the challenge and the four steps will be completed, with support, by the student.

Extra!: The problem solving process has already crossed over into our other learning activities! Several occasions when reading, students have asked, how do I say this word? I refer back to the process. Step 3! Try! Then they smile and jump in with their attempt.

Coding is for all! For primary ESL students, too!

My current lane is secondary ESL, however my first experience in preK-12 was in the primary grades. My National Board Certification is in English as a New Language (ages 3-12) and I spent 9 years teaching primary with a focus on sweet ESL students ages 4-5. To renew my original certification, I crafted a coding lesson for a group of “borrowed” students at the local primary school. Here are the slides that I created to support my lesson. Feel free to use them!

When I observed prior to teaching the guest lesson, I saw that the students were reviewing life cycles—YES! There’s an opportunity for sequencing! Perfect. What subject matter? Animals? Plants?

Corn! A big lump with knobs, it’s got the juice! No–that viral Tiktok video came out a year later. I had a better hook.

I pulled the kids into the lesson with a big bag of Maseca, which has a picture of corn on the front. Maseca is corn flour, primarily used by my hispanic families to make tortillas. In fact, they will often call corn flour by it’s company name, just as in English a person will say, do you have a Kleenex meaning facial tissue, they will say I bought Maseca, meaning, corn flour.

Maseca!

I then taught the life cycle of corn with beautiful images by Mommyhood Montessori Learning, purchase yours from her store on teacherspayteachers here.

In this lesson, I focused on the skill of debugging, that is, problem solving. For English language support, I taught the students to first identify what was missing and then, explain where it belongs. These students were Level 2 students and needed opportunities to extend their discourse. Explaining is one of WIDA’s Key Language Uses, it’s a prominent use of language across the curriculum as we see here in the Language of Science Standard and also, I’d add, the language of computer science.

Each student identified what was missing then we explained in chorus, “______ is missing! It is not where it belongs. It belongs after the ______.” See one of the five images on missing stages below.

The sprout is missing! It is not where it belongs. It belongs after the seed!

After the students practiced verbally identifying and explaining, we moved into the coding portion of the lesson. At what stage does the Harvester pick the corn? When it is ripe. I took them to Code.org’s free PreReader Express curriculum and introduced them to Lesson 5: “Programming the Harvester,” the students would program the harvester to pick the ripe corn.

Now these primary EL students had practice problem solving, they simply needed some simple, explicit vocabulary instruction before we watched the tutorial. We learned code, blocks, and attach.

Next, Code.org’s tutorial on the Harvester:

Result? The students were more than prepared! Using the same language that we used with the life cycle activity, when they encountered a bug (CS for an error), they identified what block was missing, explained that it was not where it belonged, and solved the problem, “It belongs after the ____ (in the code!).”

The students identified and explained in two contexts–the life cycle activity and coding. The coding reinforced the WIDA Key Language Use, explaining. Students learned the Language of Science and had an introduction on how to code!

Upon reflection, my one piece of advice would be to split this into two 30 minute lessons. I fit it all into one, and we would have loved more time to code! If you’re a primary ESL teacher, try this lesson out, and let me know how it goes!

Block Based Coding and the Language Learner’s Brain

There are different computer programming languages, Block Based Programming, Python, Java Script, C++ and more.

For beginners and language learners–our target group of learners–Block Based Programming is widely used.

I love Block Based Programming, particularly for EL students. Here’s why:

Language is learned chunks and collocations. Lewis (1997) in The Lexical Approach lists formulaic expressions:

  • Sentence Starters – Today I will ______.
  • Phrasal Verbs – to break down, to get over
  • Expressions – You’re kidding me!
  • Idioms – to have a hard time of it
  • Formulaic expressions and more. I’ve got it!

Block Based Programming capitalizes on this natural way the brain learns vocabulary and phrases. Directions/ lines of code are chunked, a boon for the language learner, showing a more complete picture of language in use-a word hanging out with its other word friends.

Scratch Tutorial on Turning a Sprite (A Character).

Blocks also include input parameters- places where you can change the number, direction word, sequence, or sound for example. This shows the language learner the flexibility of the language and what types of similar words in the same semantic category could replace the word. Bonus: note below the gradiency that the student is introduced to here.

Drop down menu from Build a Flappy Bird Game in Code.org

Get started!: MIT designed created a free coding platform Scratch for students to create digital stories, games, and animations. Also, Code.org utilizes block based programming.

Read more from about Chunking & Collocations in this Cambridge.org article. Learning Language in Chunks.